Setting up the ARM
We were supposed to set up the arm as well as the hand and fingers in class this week but we only got through the arms. We were too slow to get to the fingers.
ARMS
Before getting started you need to clean up your screen a little.
Go to: Display > Hide > Kinematics > IK Handles then do the same for the Deformers and click All.
Viewport > Hide > NURBS curves
Go to your top view
Skeleton > Joint tool
Starting with the clavicle which should be fairly close to your spine layout the arm.
Clavicle > Shoulder > Elbow > Forearm > Wrist > Palm > Middle Finger Beggining > Middle Finger 02 > 03 > Outside tip of Middle Finger > Press enter. ( each of the middle fingers should be in the joints they fold on )
You then need to set up each of the fingers. They will be separate joint sets. Each finger set should start at the inside beginning and have 4 joints total. One on each folding spot with the last one on the outside edge of the tip.
After setting them up name all of your joints from the clavicle to each finger.
Grab the inside first joint of the Ring and Index finger then Shift-select the palm joint > Press P to parent. It should create joints to the palm.
Grab the First joint of the thumb and the pinky then Shift-select the Wrist joint > Press P to parent which should connect them.
Next you should go to your perspective view and grab the clavicle > pull the entire joint string up into place as it should be laying on the bottom or middle right now. With the clavicle still selected go to Skeleton > Orient Joints.
ORIENTING THE THUMB
Since the thumb folds a little different then other fingers you are going to be orienting it a little different. I am going to try to explain this and then take a screen shot later to explain better. Select the first joint on the thumb and go to it attributes tab. actually I will just take a picture later. lol So if by some weird chance you come across this undone then it will be up shortly.
SETTING UP THE IK IN THE ARM
If you just set the IK the arm would move in way it is not supposed to so you much first set the preferred angle which you want it to fold on.
Click Elbow joint > Rotate on the Y axis (till it folds in half way) > Skeleton > Set preffered angle > default setting > move your elbow back straight.
Skeleton > IK Handle > Should joint > Forearm joint > Name Arm_IK
Window > Hypergraph - Hiarchy > Input / Output button > Select the effector button > Hit Insert on your keyboard and hold for a second > In Perspective window Drag the effect to the wrist joint and hold V to snap into place. This step make it so the arm folds in from the wrist and doesnt bend at the forearm.
Make a nurbs curve box then duplicate. (I recomend always having on in a hidden channel you can duplicate when your in need so you dont have to continuously make them. )
These boxes should be shaped for the elbow as well as the wrist. Hold V and snap the boxes to the joints.
Select the Wrist Ctrl box > select the IK handle > assign a Point constraint by going to Skeleton > Point constraint and the options box > Make sure the Maintain box is checked.
Select the Wrist box > Wrist joint > and assign an Orient constraint but make sure the same Maintain box is checked in the options box.
Select Elbow Ctrl box > IK Handle > Pole Vector Constraint with default settings.
SETTING UP THE EXPRESSION TO ROTATE FOREARM ALONG WITH WRIST
Now that your arm is set up you will want to set an expression to rotate the forearm when the wrist is rotated in order to give it a more real feeling.
With your forearm selected highlight rotate x in your attributes box > Right click and hold > Editors > Expressions
In the bottom of the box type in (name of your forearm and your wrist Ctrl box go in the L_forearm or L_wrist_ctrl spots) L_forearm.rotateX = L_wrist_ctrl.rotateX *.5;
Last thing you will want to do is connect your arm to the body.
Select the Clavicle > select the spine 4 (one before bottom of neck) > click P to parent. Which should connect the joints.
Before connecting the clavicle to the spine you can mirror the joints for the other arm or for practice just do the same thing over on the other side.
Goodluck!
-Anna
Thursday, January 29, 2009
Setting up the back
Now you get to set up the back. It is best to start out in side view.
Using the joint tool you will need to set up a joint for
Hip area (COG)
Hold v and make a second joint right on top of it
Belly button
Upper stomach
At the Arm
Bottom of Neck
Top of Neck
and then the Top of the Head
Using the joint tool you will need to set up a joint for
Hip area (COG)
Hold v and make a second joint right on top of it
Belly button
Upper stomach
At the Arm
Bottom of Neck
Top of Neck
and then the Top of the Head
Wednesday, January 28, 2009
whew.. getting a little behind on the posting! lol
I have notes, pictures and updates for 2 classes at the moment I need to post! Just a little backed up with homework. I will be getting all that up this week when I have a few moments.
Thursday, January 15, 2009
First day of class, Rough, but I learned alot!
So, this class is going to be rough.. lol 4 hours a week of notes, and trying to keep up. We are required to take notes in order to do well on the midterms and such. So I am going to be posting my notes for each week here to have them available to me at all times as well as hopefully helpful to someone else.
Anyway we started out with the newman character model, minus to rigging.
Our teacher started with showing us a Nurbs Curve Box. (The little box that goes around the feet and knees and contains all your attributes for animating.) Here are my notes for that..
Nurbs curve box
Create poly cube
Create > ep curve tool (options box)
Set degree to 1 linear
Hold down v and click on all verts
Press Enter
Use your move tool to pull it away from the original box
The Rigging started with the Reverse Leg setup as well as reverse foot. We hid the box on a layer and pulled our character into side view.
REVERSE LEG SETUP
Look at character in Side view
Animations tab
Skeleton > Joints
Start your joints at the hip area on your character and then click down in this order
Hip > Knee > Ankle > Ball > Toe
Make sure your view joints is on in view port
Name all joints (Hip, Knee, etc.)
To move a little hold D while moving joint
Click top joint
Modify > prefix hierarchy name > add left or right
REVERSE FOOT SETUP
Sideview > Joint tool > Add Heel > Hold V (snap) and click on toe > ball > ankle
Name them
Move into place
Snap them together
Skeleton > Orient Joint
(More to come very soon. Need to get a few things done at the moment)
-Anna
Labels:
AILV,
Angela Meeks,
Anna Meeks,
character rigging,
Maya 2008,
newman
Monday, January 12, 2009
All ready for class!
Well, I logged into my online version of my class and it looks like the first half of the quarter is all done with a character that we are given, that means for now I will hold off on finishing my model until I understand a little better how to model "for rigging".
I thought I was going to have to miss the first class but now I don't need to, yay! So I get to go to the first one tomorrow :) Wow, why on earth am I excited to go to class..
Anyhow The model is not too bad as is right now. The body needs alot of work but the head is actually okay right now. Nothing new to tell.. Maybe tomorrow
-Anna
Monday, January 5, 2009
Head is just about complete!
All I really need is a little face shaping, ear tweaking and then I am going to model the hair! Well, I may need to spend another hour or so on the nose as well. Boy this is taking quite some time, but hopefully it will be totally worth it when it comes time to rig! I have to miss my first rigging class though :( so I am hoping to get some notes or a demo of some sort.
I think my lips are the very best part! When I smooth the head it looks great! Hopefully I can finish it up tomorrow at work.


Not too much new newz.. more later :)
-Anna
I think my lips are the very best part! When I smooth the head it looks great! Hopefully I can finish it up tomorrow at work.


Not too much new newz.. more later :)
-Anna
Sunday, January 4, 2009
Head modeling can be hard!
Saturday, January 3, 2009
Modeling my Little Brother!!
Well, I am making this blog to follow my progress as I learn how to rig a character model. It's for me to look back on as well as others to maybe use as a tool if you get stuck at a point that I have covered.
Little about me to start with. I am a senior at The Art Institute of Las Vegas, studying Media Arts and Animation. I just finished a class in character modeling and start one in character rigging in a week. I didnt actually come out of the modeling class with a useful character so I decided to make one during my 3 week break between quarters. My little brother very nicely (bribed with skittles) posed for my character. I am trying to do a sports themed demo reel and he is the perfect size to be a teenage snowboarded/basketball player/baseball/skateboarder/etc. So I am modeling him over the next week and then hope to begin rigging him when class starts.
I started by taking pictures of him from all angles (which I wont post because he doesnt want me to, but I will show one when done) and then used a generic "half body" we made in my modeling class. (see post below [will be added shortly]) I find its a great foundation to get started. It has a complete hand as well since I do not really want to do the finger nails and such over and over :)
I took the pictures and scaled a front and side pose in Photoshop to the exact same size. Then imported them into Maya as Image Planes. I began by manipulating the generic body I had to fit my Brothers a little better. Its not too far along yet but I will be spending quite a few hours on it tonight before bed. I will log on and post a picture of it at that point or tomarrow. I also want to begin his face. I only know to start the face as a square polygon and do some extruding. I hope thats the best way to go about it because I want this model to really look good.
I am off to model some.
-Anna
Labels:
Character Modeling,
Daniel Meeks,
Maya 2008
Modeling Shaggy from Scooby Doo
Back in October 2007 I finished a character model of Shaggy for a class assignment. I have decided to post a small tutorial for me to look back on as well as training to anyone who might need a little help. I will not get into actual modeling detail because I am not a great modeler myself but this is more on how I set up maya to model.
Okay to start the class we needed a character turnaround of Shaggy and there was conveniently one found on google image search. which I cant find anymore but I have my cut up version. I took it into photoshop, cut out the front and side view and resized them so they matched up perfectly.


Then the next step is to import them into my front and side image planes. I named them front and side and droped them into my source images folder. I opened a new project in Maya and made sure it was set. Go to your 4 panel view (Persp/Side/Front/Top) and then open your front view. Inside the stage area open View from your menu bar, then go down to Image Plane > Import Image.
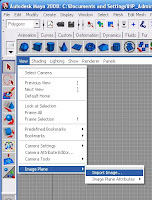
It should open your source images folder if you have your project set. Inside that select your front picture and open. You should now see your picture on the stage. You will want to line it up correctly so the feet touch the bottom line and the middle line cuts the body in half (or close to that). If you click off of the picture you can reselect by following the same menu choices ( View > Image Plane > Image Plane Attributes > ImagePlane1 ) You can move it around by clicking open your Channel box/layer editor while the picture is selected. Then you use your Center X, Y, and Z numbers to move it. Center Z should move it back ward away from your stage. You will want to keep track of what number you use for that in order to keep consistency with your side view.
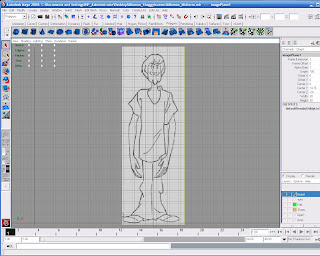
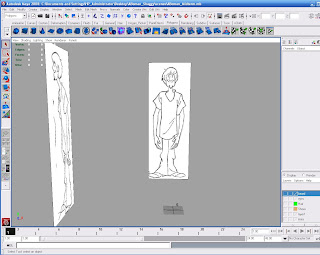
Now do the same thing with your side view. Import your image plane the same way. Then click your perspective view and you should see this.
So now you can finally begin modeling. We started with a hand which took about 4 hours to complete, and then we were kind of let loose to play with vertices and polygons.. lol I found the hardest peices were the face and hair. I know I was trying to do this as sort of a tutorial but I am tired and so I may add more later. Here are a few pictures of my final model though. I got an A (95/100)
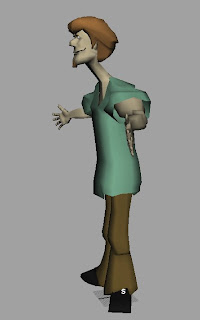
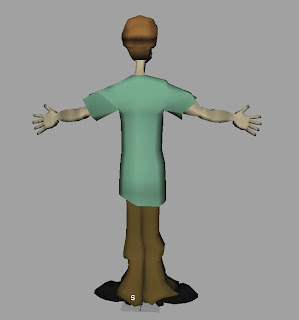
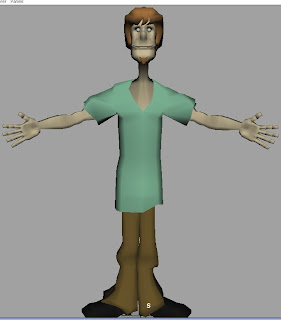
-Anna
Okay to start the class we needed a character turnaround of Shaggy and there was conveniently one found on google image search. which I cant find anymore but I have my cut up version. I took it into photoshop, cut out the front and side view and resized them so they matched up perfectly.


Then the next step is to import them into my front and side image planes. I named them front and side and droped them into my source images folder. I opened a new project in Maya and made sure it was set. Go to your 4 panel view (Persp/Side/Front/Top) and then open your front view. Inside the stage area open View from your menu bar, then go down to Image Plane > Import Image.

It should open your source images folder if you have your project set. Inside that select your front picture and open. You should now see your picture on the stage. You will want to line it up correctly so the feet touch the bottom line and the middle line cuts the body in half (or close to that). If you click off of the picture you can reselect by following the same menu choices ( View > Image Plane > Image Plane Attributes > ImagePlane1 ) You can move it around by clicking open your Channel box/layer editor while the picture is selected. Then you use your Center X, Y, and Z numbers to move it. Center Z should move it back ward away from your stage. You will want to keep track of what number you use for that in order to keep consistency with your side view.

Now do the same thing with your side view. Import your image plane the same way. Then click your perspective view and you should see this.

So now you can finally begin modeling. We started with a hand which took about 4 hours to complete, and then we were kind of let loose to play with vertices and polygons.. lol I found the hardest peices were the face and hair. I know I was trying to do this as sort of a tutorial but I am tired and so I may add more later. Here are a few pictures of my final model though. I got an A (95/100)


-Anna
Subscribe to:
Posts (Atom)


